


Why do we still drill holes in Plexiglas?
December 2000, building my RV-6: the time to fit the canopy approached, and as I had absolutely no experience working with Plexiglas, I decided that it was time to call the professionals. John Mc Kerchar, a friend of many years had been working with Plexiglas for at least 20 years so he was the natural candidate to advise me. Amongst other useful bits of advice he gave me, one stuck in my brain. 'If you apply a load to Plexiglas, it will crack. The only question is when?'
Another RV builder in the RSA had used Sika Flex 255FC to seal the gap at the bottom of his windscreen to prevent any air leaking in below the fuselage to windscreen fairing, but unfortunately, this builder turned his aircraft upside-down in a landing accident. When the time came to remove the windscreen I happened to be there to help and found that even though he had not used any sort of primer on the metal or the Plexiglas, we still had to use a wire to cut the windscreen from the airframe. This made me start thinking, this stuff must be a really good adhesive, why not glue the canopy and windscreen down? So I ran the idea past John and he was most enthusiastic.
To ensure a proper contact between the three materials, paint/Plexiglas/aluminium, two primers are needed. Sika Primer 210T for the aluminium and Sika Primer 209 for the Plexiglas.It is now 12 years later and there is still no sign of any distress in the Sika and I have flown this aircraft in the heat of the Namib Dessert and at altitude at temperatures of -20°C. The procedure has been used by many around the world and refined by the experiences of others.
Generally Sika 295UV is the preferred adhesive as this is used to attach Plexiglas in the hulls of yachts, but your local agent could recommend another similar product. The product technical splurb will advise you to use at least 6mm of adhesive between Plexi and the structure, which I am sure is necessary in a yacht; but not in an aircraft canopy.
Start off by trimming the canopy to fit the frame, and the roll bar and the fuselage as per Van's plans and/or any other more detailed information, which is available on the Internet. To ensure an adhesive layer of 2 to 3 mm, cut short sections of common plastic garden hose and split these so that they can be fitted between the Plexi and frame/roll bar.
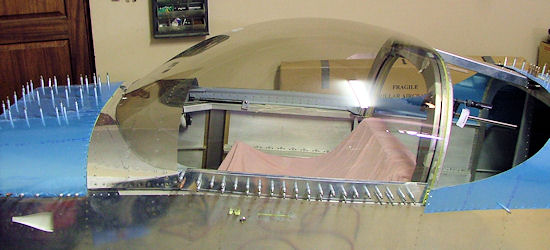
Mark the canopy and tape off the areas where the primer is to be applied to the mating surfaces and lightly scuff this area to remove the glossy shine of the surface. Be VERY careful when applying Sika primer 209 to the Plexi as a drop of the primer in the wrong place will immediately etch into the Plexi. Apply Sika primer 210 to the aluminium and scuff the mating area of painted surfaces with 100 grit abrasive paper. It is not necessary to remove powdered coatings as the bond between Sika and the metal will not be any stronger than the bond between the paint and the metal; assuming that the powder coating/paint was applied properly.
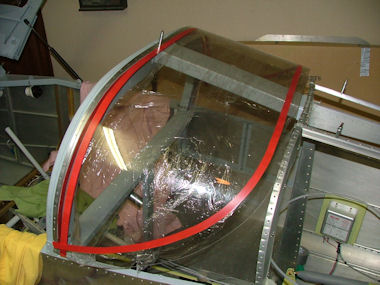
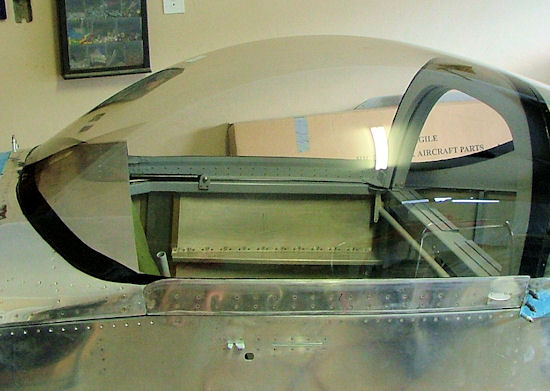
When ready to apply adhesive, tape, clamp, strap, etc. do whatever you have to do to hold the Plexi in place, then add small dabs of Sika between the plastic garden hose 'standoffs' to attach the Plexi to the structure and let the Sika cure. Yes, I am aware the splurb says the primed surface should be covered with adhesive within a few hours, but this is a compromise. Once the Sika has cured, remove the stand-offs and apply a neat fillet between the Plexi and the structure. The side skirts can be fitted the same way to capture the Plexi, but this cannot be done with a 2 or 3mm coating. In my RV, this coating is paper thin and works like a charm as there is no flexing or movement in this area.
The front of the canopy is a bit more difficult as you have a few choices. You can apply Sika and smooth it to a nice contour, then polish this surface with soapy water and your fingers, or simply smooth the surface and let it cure; then apply a fiberglass fairing over the joint as called for in the plans. If you leave an exposed fillet of Sika, this should be left bare and not painted as someone is sure to dig a fingernail in the joint one day!
To finish off the seal between the (sliding) canopy and the windscreen, fill the void between windscreen and roll bar and the canopy and it's frame. A soft seal can then be fitted to the cured Sika, to seal the gap and (in an RV with the slider canopy) the fiberglass strip over the joint between the windscreen and canopy is not required.
If you want to protect the Sika/Plexi joint from direct UV then tape off the joint on the outside of the windscreen and canopy and scuff the Plexi, then apply the Sika primer. To cover the black primer and joint, you will need to first apply 'silver paint' (aluminium) then your colour.
To me the benefits are obvious…
1. The canopy rests where it wants to be till the adhesive cures, reducing stress to the Plexiglas.
2. There are no point loads applied to the Plexiglas such as pop-rivets and screws.
3. The adhesive remains flexible, allowing the canopy some movement.
4. There are no unsightly fiberglass strips between the canopy and the windscreen. The joint is neat, clean, smooth and watertight.
You will also not have to face the stress of drilling a multitude of holes in your canopy, but if you do have to drill a hole, then either buy a specialist drill for Plexiglas, or modify your own drill bit. Plexi will crack when your sharp drill bit exits the Plexi, bites, twists, crack… To prevent this from happening, take a small cutting disc (Dremmel comes to mind) and blunten/flatten the sharp cutting edge of each drill flute. The blunt cutting edge should have a flat leading edge parallel to the centre vertical axis of the drill and should be about 0.5mm wide.The idea is for the drill to bore/gouge/scrape out the Plexi and not cut it out. Practice on off-cuts of Plexi first; drill slowly and carefully, particularly as the drill exits the Plexi and you will find it IS possible to drill holes and not crack your canopy! For bigger holes use a unibit/step drill.
Keep it safe out there.
 |
 |
 Copyright © 2024 Pilot's Post PTY Ltd
The information, views and opinions by the authors contributing to Pilot’s Post are not necessarily those of the editor or other writers at Pilot’s Post.
Copyright © 2024 Pilot's Post PTY Ltd
The information, views and opinions by the authors contributing to Pilot’s Post are not necessarily those of the editor or other writers at Pilot’s Post.