


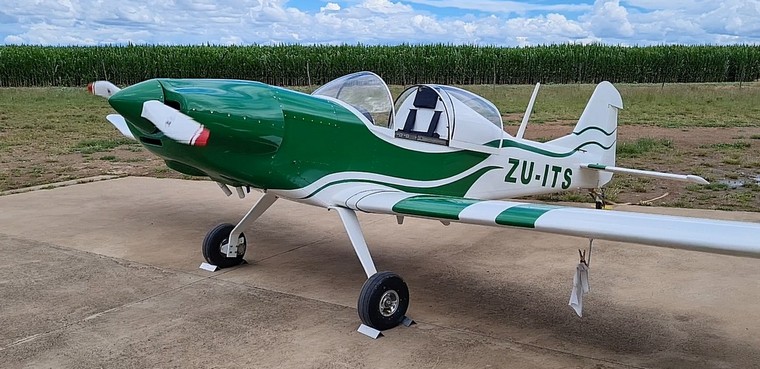
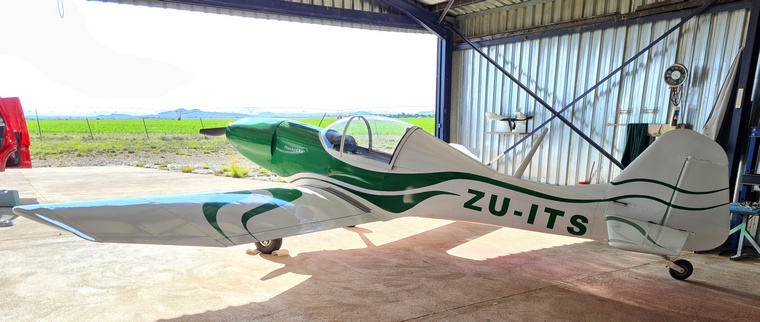
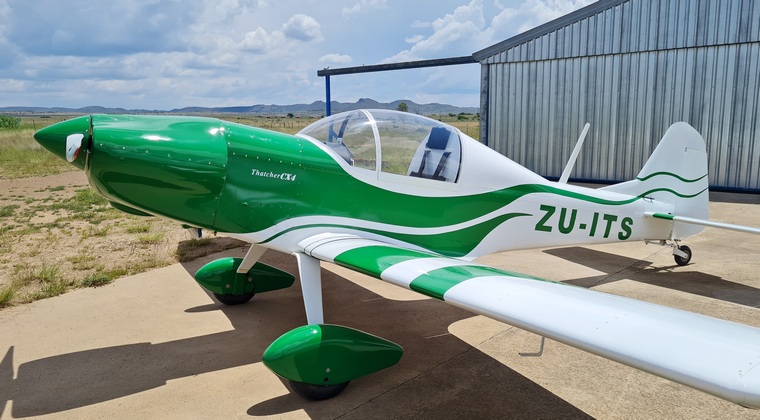
Peter Howe, my Thatcher CX4 project
By Peter Howe
Google Banner Ad
There was no kit available, but in any case, I wanted to learn all the metal techniques and try to avoid importing as much as possible. There were already two CX4 flying in the western Cape, so getting a build number was easy and the plans were ordered.
I liked the idea of a VW motor, since parts are cheap and there is such a bug craze in the USA, that new parts will be available for decades to come. Since this was a scratch-built project from plans, I decided to build the motor too. I soon found that locating a good VW engine locally, was not going to be easy, especially considering where I lived near the Karoo. So, I ordered a Great Plains 2180 VW kit rated 75hp. This is a Type 1 block, bored and stroked. A smaller capacity would have been adequate, but then the crankshaft would not have the large output bearing and long taper on the prop hub.
The plans arrived from Dave Thatcher and I started ordering AN hardware and 6061 sections from Spruce. All the 6061 sheet came from Alclad at Lanseria. Since I had a long history in composites, I had to buy some additional tools, mostly related to cutting thick sheet. Long straight cuts of up to 032 were done using the score and bend method. I had long bends to make, so I built a 3m bender from 75mm mild steel angle and heavy-duty piano hinge.
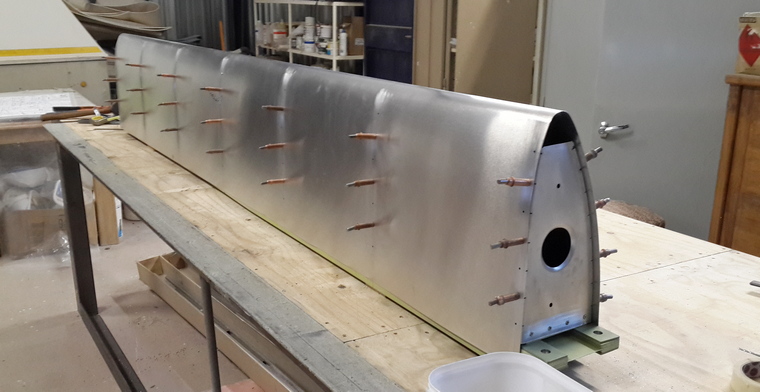
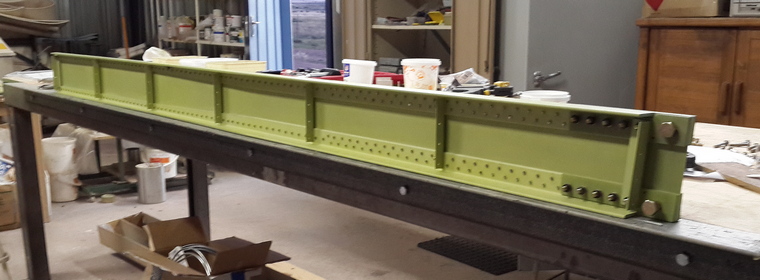
The CX4 uses mostly stainless steel pulled rivets, like many other designs. No dimpling, but not being a punched hole kit, it means drilling undersize first, clecoing, redrilling to 1/8 inch and then deburring. Many thousands of times. I used a 30-year-old pneumatic pop riveter. At least I did not have to drag Fran out to buck solid rivets. The wing spar is fabricated from 6061 T6 1˝ inch angles and 032 sheer web. This does use solid rivets, but it was easy to buck rivets with a steel block behind the assembly. Some builders used an arbor press for this job. I should have, since it would have saved on buying a rivet gun.
I like 6061 T6. It has fairly good corrosion resistance, so holes and edges can be deburred with 220 grit paper. It bends well and is easy to machine and drill. Now the dangers from fiberglass dust were replaced with cuts all over my hands, until I bought gloves at the local co-op.
The plans comprise about 20 pages of hand drawings, mostly not accurate to scale, but with a lot of full-size patterns. On the CX4 I found that one could not take everything for granted. For instance, you formed your own ribs and had to determine yourself what the spring back would be and how much smaller the form block would have to be. Sometimes these errors would multiply, and getting the fuselage bulkheads to line up with tapers in all directions took me a couple of weeks. I am sure that no CX4 is absolutely identical to any other.
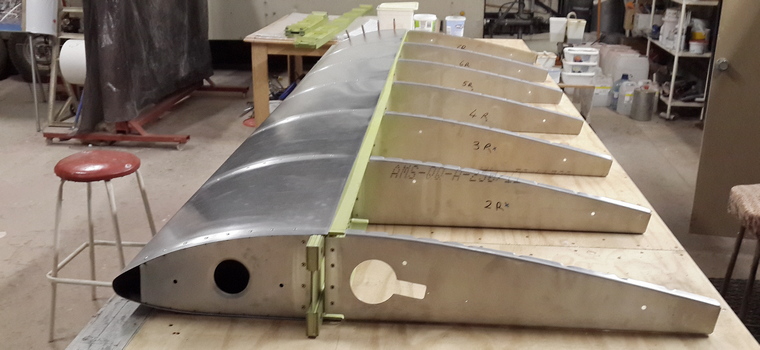
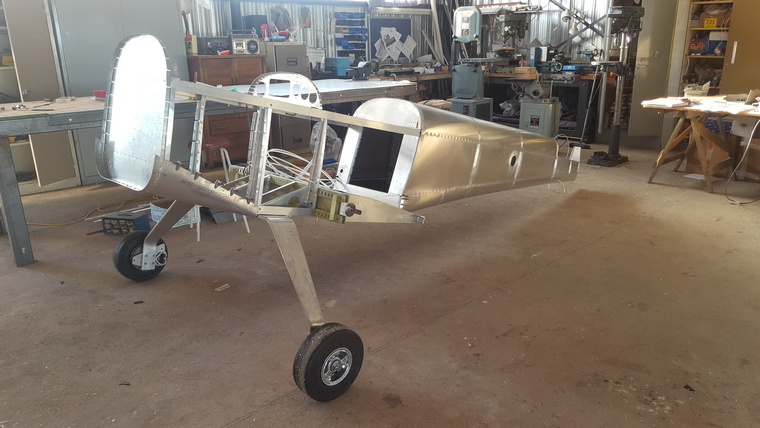
You would think a metal aircraft means no dust. Punched hole kit builders don't know what you are missing! I spent more time making wooden form blocks than anything else. Luckily the main part of the wing has no taper, but the fuselage has mostly an oval cross section and was much more work than the wings. Without a set of rollers, bending some of the curved thicker skin on the forward fuselage was quite difficult, requiring a lot of luggage straps to pull skin over the tail boom. But the 020-wing leading edge, which extends top and bottom up to the spar, turned out very easy to shape by vacuum forming the sheet around a steel pipe inside a large plastic bag, using a vacuum cleaner. I used the same process on every leading edge, without any assistance.
Construction starts with the spars, then building up the one-meter-wide center wing section, then the two wings. It took me a while to find a way to reliably locate a rib when drilling blindly through the wing skin. Kit builders don't know what fun they are missing. Once the wings mate properly to the center section, you put the wings aside and build the front part of the fuselage around the wing center section. Then the tail cone is built, all on a long wood topped bench. I opted to fit a dive brake which swings down under the center section, electrically operated by a Honda window winder, all according to Dave's design.
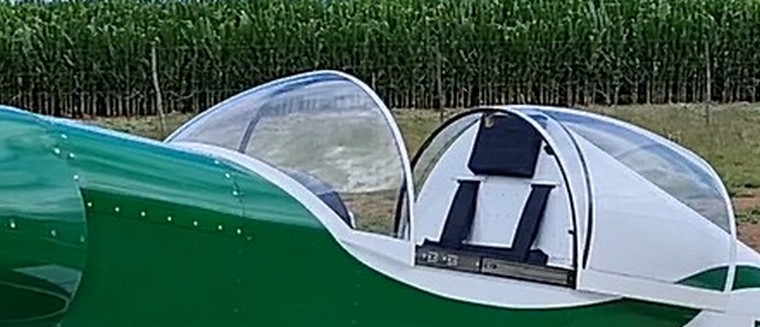
Importing a moulded canopy was going to be prohibitively expensive, so I approached John "Fluffy" McKircher, who had blown my first glider canopy over 40 years ago. I cut down a large oblong free blown shape and used Sikaflex and 3mm screws to secure an optically perfect and good-looking sliding canopy with fixed windscreen. I used drawer slides.
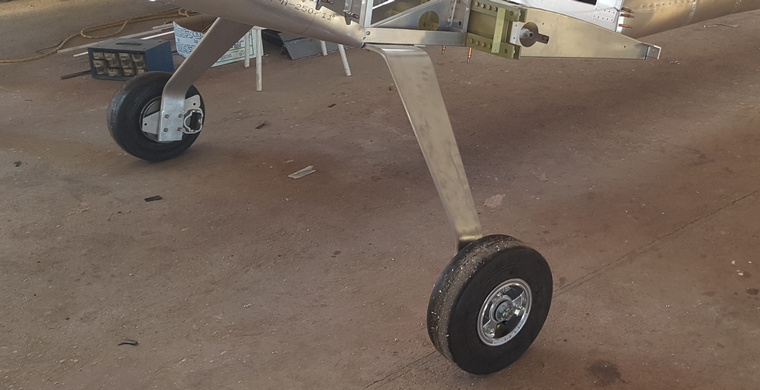
Another potentially expensive import was the 6061 T6 aluminum spring undercarriage leg. One CX4's builders blog showed how he had cut and cold bent his own. I was lucky to find a similar alloy here, had it waterjet cut, rounded the edges and cold bent it on my 10-ton press with specially made large diameter bending blocks. My friend Pieter v d Merwe in Bloemfontein rounded the edges and machined a groove for a hydraulic brake line. The wheels are 500-5 on my CX4.
My steerable tail wheel is similar to that used on RVs, but with a pneumatic tyre. I made a flat blade glass fibre tail spring, since they don't suffer fatigue failures like spring steel.
The tail group went together quite quickly, although the drawings required a lot of cross referencing to get everything dimensionally correct. The elevators are counter balanced.
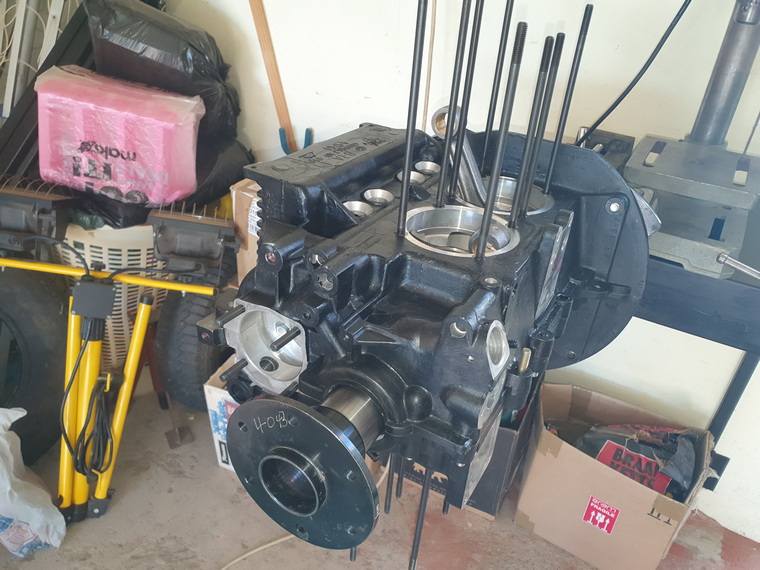
I built the engine at home during the covid hard lock down. My brother-in-law, who builds VW engines for Beatle collectors gave me lots of telephonic advice. I enlarged oil ways, fitted a large oil pump, oil pump pressure relief for cold mornings, large full flow remote oil filter and now as it turns out, too large an oil cooler. I set up the compression ratio to 7.8:1 for 95UL petrol. The engine kit came with an unused US government surplus Slick magneto. I opted for a fixed advance, secondary ignition which used Hall Effect sensors from the ex-distributer drive which switches two coils and an electric starter
Pieter De Necker built a nice 54-inch prop and a professional welder completed my engine mount fabrication.
A 50L fuselage fuel tank mount just behind the fire wall. The simple Zenith carb will work with gravity feed at up to half throttle in flight, but I fitted two electric pumps in series with one way bypass valves across them. A feedback line to the top of the tank helps to reduce vapour lock problems.
Anton Tallie, the first CX4 builder in SA, sent me his engine cowl moulds from lovely St Helena Bay, which saved me a lot of work.
Due to the electric pumps, I implemented a dual lithium battery system. The 3-phase alternator inside the VW bell housing connects to what I believe is a Harley Davidson rectifier regulator, rated up to 30A. An overvoltage relay protects against erroneous over voltage and a flashing LED off a low oil pressure switch reminds me not to leave the master on. The backup battery is automatically charged and together weight less than 2,5Kg. After start I see around 15A for a minute or two.
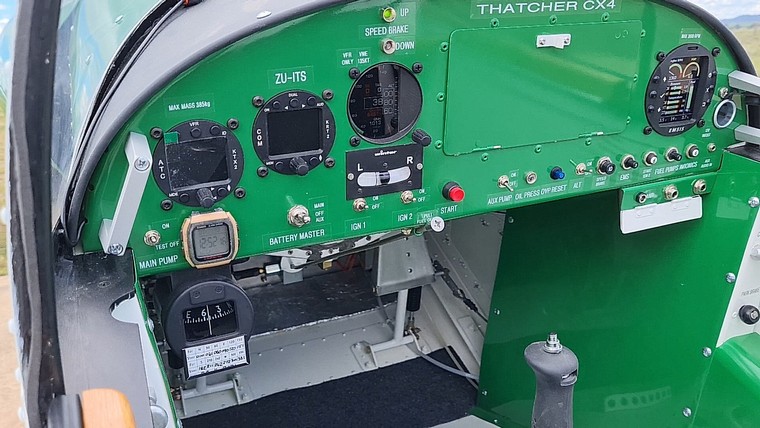
Being the Kanardia and TQ Avionics distributer, I of course used my own products for a minimal panel comprising VHF, transponder, Horis PFD and EMS. An old mobile phone runs Easy Cockpit.
The empty weight is 263kg and things like light weight lithium batteries and a simple instrument panel perfectly positioned the C of G. With full fuel I could still carry 11Kg of luggage.
I applied for Proving Flight Authority in November 2021 and in January 2022 I began the obligatory 3 hours of ground runs, and being a taildragger with quite a high angle of attack, lots of taxi tests and high-speed runs.
I used AC-90-89 for my 40-hour test flight plan.
In the run up to the first flight, there was a bad mag drop, which after removing the engine, turned out to be a broken impulse coupling spring, which looked suspiciously second hand.
After that, the test flying proceeded well. Being a single seater, I found that a glider flight recorder was a very convenient way to record climb rate tests and maximum altitude. The Kanardia EMS recorded all engine data every second, which I could analyse on a spread sheet.
Handling was good and predictable. By throttling up slowly, the swing to the right (VW) was easy to control. Best climb rate was 600fpm at 65kts at 3050rpm. Stall was just below 45kts, still with good aileron effectiveness and an approach speed of 63kts was good for a 3-point landing, 70 for a wheeler. Maximum level flight speed is 105kts IAS at 3600rpm.

The CX4 handling is really super. Stick movements are quite small. Hardly any rudder is required. The elevator trim is effective down to 60 kts. On round out, even at low speeds, there was plenty of elevator authority left.
The airframe was petty clean, so it is important to stabalise the downwind speed to 70kts. The speed brake was most effective above 80kts.
CHT was remaining below 130 deg even after long climbs, and the oil never went over 74 deg C. I had over compensated with too large a cooler. So, I fitted a blanking plate to cover half the inlet and managed to raise the oil temperature to around 85 degrees.
Before the maximum ceiling test, I set the ground adjustable fuel mixture using a car speedometer cable temporarily connected to the needle and used EGT to determine a slightly rich of peak setting at cruise throttle position. Later I reached FL152.
Fuel consumption at a 90kt IAS cruise at 3275rpm measured at 14,5L/hr., giving me a 2hr 50 min cruise speed range with 30min reserve. Indications are that at 80kt and 3000rpm, fuel consumption drops to 10L/hr.
With an airfield elevation is 4000ft, with no obstructions and a compacted gravel surface, the takeoff distance at rotation is 400m and the landing distance 500m.
VNE is 135kts and at that speed there were no surprises.
At 25hrs an oil and filter inspection showed no metal and the valve gaps had hardly changed. Oil consumption and leaks was almost zero.
Google Banner Ad
Just when I thought everything was perfect, the puck coupling the flywheel to the magneto cracked. Its unusually long shape had allowed a wobble to set up. By now I was fed up with this aged magneto and replaced it with an E-Mag. It looks a bit like a magneto, mounts the same way, but it is timed to TDC and advances the ignition automatically to wherever you want, set by the factory or with free software. I had a friend machine an extension onto the shaft for a ˝ inch drive puck, where the dogs overlapped at 90 degrees to each other, minimizing any wobble. No impulse coupling meant no sudden shocks into the drive puck. A nice feature is that it has an internal alternator, so except for engine start, it needs no external 12v supply. Timing can be checked visually through an LED on the casing. I had to change the spark plugs to resistor types. The spark is huge, but now all ignition noise on the radio had disappeared. 20 hours later, the timing is still spot on.
After over a hundred takeoffs I noticed stone chips under both sides of the elevator, so I fitted wheel spats. They look nice, but the top speed never changed,
Late November 2022 I applied for my first ATF through the Aero Club Aero Assist program. On the day the Proving Flight period expired, I received an ATF at the end of January 2023.
Thanks to Sarel van Rensburg, Peter Lastrucci and Manfred Springer who checked on the project.
Google Banner Ad

 |
 |
 Copyright © 2024 Pilot's Post PTY Ltd
The information, views and opinions by the authors contributing to Pilot’s Post are not necessarily those of the editor or other writers at Pilot’s Post.
Copyright © 2024 Pilot's Post PTY Ltd
The information, views and opinions by the authors contributing to Pilot’s Post are not necessarily those of the editor or other writers at Pilot’s Post.